Posts

Showing posts with the label homemade

Trangia Lighting Procedure

Image
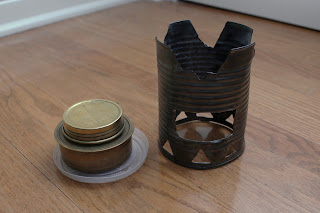
A brief follow-up: using my homemade soup-can pot stand, the lighting instructions: 1. The stove and stand are set out. In cold weather, the stove is set on a plastic soft drink lid to insulate against the ground.  2. The lid is remove, and the burner is lit. The pot stand is then carefully placed over the burner.  3. Wait approximately 30 seconds to let the burner 'bloom'; the  flame must come out of the burner's holes. Often, an audible 'pop' noise will signal that the flame has bloomed, and the stove is warmed  up. 4. Now, the stove is ready to cook food!  5. Unlike ready-made cooksets, this DIY pot stand must be removed with a pot gripper before  the stove can be extinguished. Once the hot pot stand is removed, the Trangia's lid is dropped over the flame to extinguish it. 

Gear Review: Trangia Alcohol Stoves

Image
My first post of the new year will deal with my little Trangia stove I've picked up a while ago. Now that I've been able to use it on a few day-hikes during the Christmas break, I can confidently review it. The first, and most obvious point, is that this is an alcohol stove; these stoves can burn the commonly found methanol, ethanol and even isopropyl rubbing alcohol. This stove cannot burn anything properly but alcohol - I tried white gasoline and ended up with a sooty, fireball-prone mess - and this could leave much to be desired in a third-world setting where kerosene/autogas (petrol) is all that may be found. But, here in Canada along with the US, most of South America, and Europe, methanol is easily found in nearly every hardware shop. Often it is labelled as 'methyl hydrate', and so people overlook it, but 4L can be be had for $10. Trangia burner w/ homemade soup can pot stand. The port is wide enough to allow use of the simmer ring. It is important that I sa...

Screw It; I'm Making Studded Tires

Image
As the title of this post implies, I've gone and gotten myself a pair of studded tyres on the cheap - by fabricating them. Those old Chen Shins I had on the bike's rims came off without a single stud, but went back on with a ice-grippin' 104 studs per tyre. Total cost: $12.78 for 250 1/2 in. 8-size screws, compared to $100 + tax for the cheapest pair I could find elsewhere (including the interweb).  My time is valueless, so I won't put a dollar value on the 2 1/2 hours I spent on the endeavor.   Drilling, and a lot of screwing-in  On the road, they are really grippy on ice - like being glued  to it, even while riding on an outdoor skating rink! But, since the tread pattern isn't that deep, it still has trouble in the slush or packed snow. On fresh snow, however, it performs quite superbly! One really can notice the clickity-clickity-clickity of the screws on the pavement, and feel the drag also. Tyre #1, finished - look at that! 1/4 in of spike show...