Posts

Showing posts with the label camping

Stove/Fuel Choice for Italy

Image
In Italy, we hope to cut our costs down somewhat by cooking as many of our meals as possible. But, the availability of stove fuels is somewhat different that North America, meaning that choosing a stove is a little hard. White gas (camping fuel), and the standard EN417-threaded butane canisters so plentiful here are quite scant in most of Europe - Italy included. Across the pond, Campingaz' dominance in the market means that its own proprietary canisters are ubiquitous throughout much of the continent, to the chagrin of many tourists, who won't have much luck finding EN417 butane canisters for their stoves in all but the largest cities in Italy.* *Update: We have completed our tour of Italy, and in fact did not have too much difficulty locating the EN417-threaded canisters.  We purchased our refill at an odd little "Liquigas" shop in Siena, a chain which appears to be unique to Italy. There are more of these shops, and so our advice would be to start the search the
Italy Trip: Itinerary in Brief

The planning continues, and now I've managed to figure out all the stops, the route and where we will camp on our journey from Florence to Rome, Naples, Pompeii and the Amalfi coast. The aeroplane has been booked - leaving May 31 from Toronto Pearson, to arrive June 1 in Florence. We will be returning almost 3 weeks later, flying out on June 18th with 2 layovers (Frankfurt, Germany, and Washington, D.C.) before we arrive back in Toronto. The Itinerary in Brief: 5/31 -  18:40 departure from Toronto 6/1 - 14:00 arrival in Florence! ----> Rest-up day. 6/2 - Touring Florence, seeing the sights. 6/3 - Florence to San Gimignano: 74km        - 8:00 departure by bike        - ETA 17:00        - 17:00 - 20:00; dinner + evening in town        - 21:00; Lodging - arrival @ Camping Baschetto di Piemma 6/4 - San Gimignano to Colleoli: 53km        - 8:00 -13:00; breakfast/tour/lunch        - 13:00 Depart        - ETA 19:30 Colleoli        - Lodging: Local Agriturismo 6/5 - Co

Homemade White Gas "Still"

Image
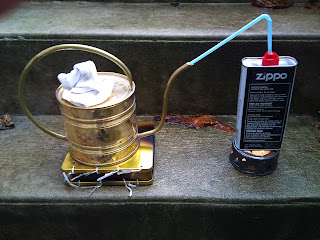
Almost everybody is familiar with the venerable Coleman suitcase stoves and pressurized lanterns - both of which run on what is known in N. America as "white gasoline". White gas, camp fuel and naphta are all different names for the same fuel. It is essentially a more refined version of gasoline (petrol for those of you in the UK!), with fewer smelly, carcinogenic compounds like benzene, toluene and octane-boosters. These additives are good for cars, but can clog stove generators and jets as they form viscous gums, which is why the more refined white gas does without them. Unfortunately, the camp fuels sold at stores aren't cheap by any stretch of the imagination. Here, a 3.78L (1 US Gallon) can of the cheapest camp fuel fetches about $15.50. Well, what about regular gasoline then? It's relatively cheap, and readily available, but can clog stoves and burns with an odour. Following my grade 11 chemistry background, I decided to try making a "gasoline still"

Gear Review: Butane Canister Refill Tool

Image
Update 13/05/13: It has been noted by someone that the company's policy of shipping their adaptors in simple sealed, unpadded envelopes can cause problems - the unpadded envelope may rupture, leading to package loss. I suggest voicing any concerns with shipping to the owner. An $8 piece of equipment which I highly recommend to any canister stove or lantern user is this butane canister refill tool. I managed to find it from the Camping In Taiwan website/webstore,  here. * The bayonet-to-threaded refill adapter With butane, there are two standards: the wide and squat EN417 threaded style canisters used in camping applications, and the thin and tall bayonet-style butane canisters often used in home applications. This above tool allows anyone to refill their isobutane/butane blend EN417-threaded canisters with the bayonet type butane cartridges. The benefit of using these bayonet cans to source fuel is obvious: they are cheap, cheap, cheap! But, because they have a bayonet fu

Trangia Lighting Procedure

Image
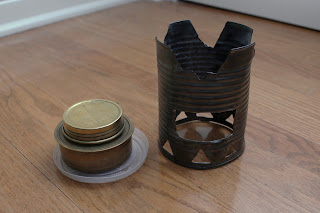
A brief follow-up: using my homemade soup-can pot stand, the lighting instructions: 1. The stove and stand are set out. In cold weather, the stove is set on a plastic soft drink lid to insulate against the ground.  2. The lid is remove, and the burner is lit. The pot stand is then carefully placed over the burner.  3. Wait approximately 30 seconds to let the burner 'bloom'; the  flame must come out of the burner's holes. Often, an audible 'pop' noise will signal that the flame has bloomed, and the stove is warmed  up. 4. Now, the stove is ready to cook food!  5. Unlike ready-made cooksets, this DIY pot stand must be removed with a pot gripper before  the stove can be extinguished. Once the hot pot stand is removed, the Trangia's lid is dropped over the flame to extinguish it. 

Gear Review: Trangia Alcohol Stoves

Image
My first post of the new year will deal with my little Trangia stove I've picked up a while ago. Now that I've been able to use it on a few day-hikes during the Christmas break, I can confidently review it. The first, and most obvious point, is that this is an alcohol stove; these stoves can burn the commonly found methanol, ethanol and even isopropyl rubbing alcohol. This stove cannot burn anything properly but alcohol - I tried white gasoline and ended up with a sooty, fireball-prone mess - and this could leave much to be desired in a third-world setting where kerosene/autogas (petrol) is all that may be found. But, here in Canada along with the US, most of South America, and Europe, methanol is easily found in nearly every hardware shop. Often it is labelled as 'methyl hydrate', and so people overlook it, but 4L can be be had for $10. Trangia burner w/ homemade soup can pot stand. The port is wide enough to allow use of the simmer ring. It is important that I sa

Stitches

It's Sunday night... I've returned from a winter camping trip this weekend, near Acton. On the drive up, the window got stuck in the down position - so, I had a  very  breezy and chilly ride. 1 foot of snow when I got up to the site, and another foot fell on Saturday night, making the tent sag a bit under the weight. Quite great weather for a winter camp! Unfortunately, while cutting some wood, I sustained a nasty gash on my knuckle; I was able to see the bone!! Needless to say, I had to get patched up with some gauze, and then head to the hospital for a more permanent 'fix'. I wasn't really injured that badly - the blood wasn't pouring out - so the 2.5 cm cut was held together with 3 stitches. I guess I'll see how it holds up to swimming tomorrow!