Posts

Showing posts with the label cheap

All-Rounder: 9-Month/1000km Follow-Up

Image
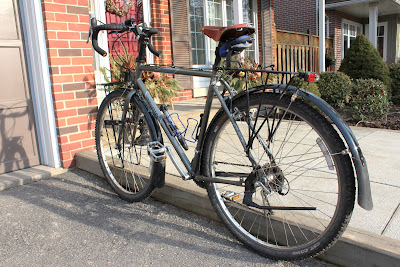
UPDATED 07/03/12: Now with pictures! I've had the O8 CX700 for nearly 9 months now, and so have put it through its paces by now. That's about 1000kms of mixed onroad/offorad/singletrack with tweaking, tuning, and general fettling in appropriate proportions. The Good: 1. Big Wonkin' Tires. There are quite a few things this bike has going for it, not least of which includes the capacity for large tires. I've concluded that you can shoehorn a 29x2.3 with fenders in there if you wanted. The 51mm (2.1in nominal) wide CST Critters have been a good fit so far. There is room for maybe 2.3in tires w/fenders, or 2.4 without.   2. A Nice Fork Design. I have had a good experience with the straight bladed fork that came standard with the frame. I know many people dislike them, because of the 'harsher ride' they supposedly give, or for their non-traditional look. Well, I can say that the ride certainly didn't feel "harsh" when riding road with 23...

Homemade White Gas "Still"

Image
Almost everybody is familiar with the venerable Coleman suitcase stoves and pressurized lanterns - both of which run on what is known in N. America as "white gasoline". White gas, camp fuel and naphta are all different names for the same fuel. It is essentially a more refined version of gasoline (petrol for those of you in the UK!), with fewer smelly, carcinogenic compounds like benzene, toluene and octane-boosters. These additives are good for cars, but can clog stove generators and jets as they form viscous gums, which is why the more refined white gas does without them. Unfortunately, the camp fuels sold at stores aren't cheap by any stretch of the imagination. Here, a 3.78L (1 US Gallon) can of the cheapest camp fuel fetches about $15.50. Well, what about regular gasoline then? It's relatively cheap, and readily available, but can clog stoves and burns with an odour. Following my grade 11 chemistry background, I decided to try making a "gasoline still"...

Gear Review: Butane Canister Refill Tool

Image
Update 13/05/13: It has been noted by someone that the company's policy of shipping their adaptors in simple sealed, unpadded envelopes can cause problems - the unpadded envelope may rupture, leading to package loss. I suggest voicing any concerns with shipping to the owner. An $8 piece of equipment which I highly recommend to any canister stove or lantern user is this butane canister refill tool. I managed to find it from the Camping In Taiwan website/webstore,  here. * The bayonet-to-threaded refill adapter With butane, there are two standards: the wide and squat EN417 threaded style canisters used in camping applications, and the thin and tall bayonet-style butane canisters often used in home applications. This above tool allows anyone to refill their isobutane/butane blend EN417-threaded canisters with the bayonet type butane cartridges. The benefit of using these bayonet cans to source fuel is obvious: they are cheap, cheap, cheap! But, becau...

The All-Rounder

Image
Without further delay, I present to you the Origin 8 CX700-framed-all-rounder: Origin 8's Cx700 frame allows me to run 29er tyres, yet doesn't look out of place running skinny rubber. The specs: - Origin 8 CX700 Cyclocross/Touring/All-Rounder frame, 56 cm * - CST Critter 29 x 2.1" tyres * - Mountain Equipment Co-Op Alloy Seatpost (rebranded Kalloy Uno) - 27.0 mm * - Brooks B17 Standard, Honey - Nitto B-115 - 40cm/25.4 mm clamp - RSX 3x8 Brifters - Avenir adjustable threadless stem w/ Origin 8 Spacers* - FSA "The Hammer" 1 1/8 in Headset * - Shimano BB-UN26 Sq. Tpr. * - Alivio 22-32-42 Crank - Victor VP-196 Pedals w/toe clips (VP-565 Platforms shown in pictures) - SRAM 12-32 7-Speed Casette - Alivio F. Der, 31.8mm clamp  * - Alivio R. Der - KMC Z-Chain * - Wheels: Alivio hubs laced to 36h Araya PX-35 rims - Jagwire "Basics" Cables + Housings * - Tektro 720 Cantis         A "*" means bought new. All other parts are scav...

How to build a $33 Touring Rig

Many thought it impossible; to construct a fully-fledged loaded-touring bike for under $500. I have gone to the "possimmpible" - the land beyond impossible, to a place where the possible and impossible meld and intertwine. Reality must then surely be warped, I can hear you all saying, if I was able to build up a touring rig for under $50 dollars!  It all comes down to the fact that many people in Canada, especially the now-ageing baby-boomers, want to get rid of   (*gasp!*)  their old bikes cluttering up their sheds/yards/garages/evil laboratories, and so can be had for free most of the time, sitting sadly by the roadside of many suburban residences. No, I did not lick out and find a nearly-complete touring bicycle that I used $35 dollars on to refurbish. But, I did the next best thing, which was to convert an old 70's Peugeot UE-8 frame and wheelset to touring quality! I must correct myself; for there are those Peugeot junkies here on the interwebs that are ...

Tube Amp

Image
I have other loves in life other than cycling - some of them being electrical projects. I've been working on this baby for a while - but, only recently has it recieved its power transformer. I pulled the transformer from an old ceiling fan; 120v to 24 volts, with ~ 1/3 amp supply capability. And that voltage happens to be *almost* exactly what I need for the heater filament of the single 25EH5 tube that comprises the amp. However, measuring the wall voltage at an actual level of 126 volts, the voltage coming out of the transformer is actually above  25 volts (ie. 120/24=5, 126/5= 25.2 volts). This is well within the 10% tolerance of  the vacuum tube's operational voltage range, being only .9% off of ideal. Right now, until I find/build a proper wooden cabinet for it, the entire amp resides in an old margarine container. Fire hazard: kids at home, never  mount a transformer to anything using tape. Even if the tape is electrical tape. The...

The Frugal Man's Patch Kit

Image
Because of all the punctures I've had to patch, I came up with a use for the beyond-use tubes I have lying around.... I made them into new patches! Turns out you can use strips of the butyl rubber from old inner tubes to patch other inner tubes quite reliably. The extra stretch compared to regular patches may also be a bonus for high-pressure tubes, or for tubes in really wide tires. At the current price of $2.50 for a patch kit with 10 patches  and two tubes of rubber cement, that's $.25 every time I patch. However, the glue usually lasts longer than the ten patches, and so I can use about 10-15 more strips of inner tube as patches, halving the cost to ~$.12 per patch. Complete inner tube first-aid kit However, if I were to buy just the glue and inner tubes, the price would drop further. Rubber glue is ~$2 for a large tube, and a whole inner tube is $3.00 at my LBS, meaning I could patch about 50 tubes  for $5 dollars. I estimate each inner tube would make ...