Posts

Showing posts from January, 2012

Gear Review: Butane Canister Refill Tool

Image
Update 13/05/13: It has been noted by someone that the company's policy of shipping their adaptors in simple sealed, unpadded envelopes can cause problems - the unpadded envelope may rupture, leading to package loss. I suggest voicing any concerns with shipping to the owner. An $8 piece of equipment which I highly recommend to any canister stove or lantern user is this butane canister refill tool. I managed to find it from the Camping In Taiwan website/webstore,  here. * The bayonet-to-threaded refill adapter With butane, there are two standards: the wide and squat EN417 threaded style canisters used in camping applications, and the thin and tall bayonet-style butane canisters often used in home applications. This above tool allows anyone to refill their isobutane/butane blend EN417-threaded canisters with the bayonet type butane cartridges. The benefit of using these bayonet cans to source fuel is obvious: they are cheap, cheap, cheap! But, because they have a bayonet fu
New 29er Monstercross from Surly

Image
Quite a few years ago, Surly introduced the then-revolutionary Karate Monkey frameset (they claim it was one of the first commercially-produced 29er frames). Now, Surly has taken the concept behind their utility bike, the Troll, and bumped it up from 26in wheels to 29in: The new Surly Ogre.   Credit: Surly Bikes Surly says that their new frame has geometry similar to the Karate Monkey (which, by following their numbers, it does), but with all the function of the Troll. What does this mean? Well, it has: - Front and rear Canti/Linear brake mounts - Disk brake tabs - Double dropout eyelets, both front and back (so you can mount fenders and racks all round!) - Specifically design for fender clearance (yay!) - Fits up to 29 x 2.5" tires, more that one should ever reasonably need - Full-housing cable mounts  - Surly-compatible trailer mount The bike seems well-equipped to be an all-rounder, off-road (or road) tourer, or nice singletrack companion.  The only quibble I have with thi

Trangia Lighting Procedure

Image
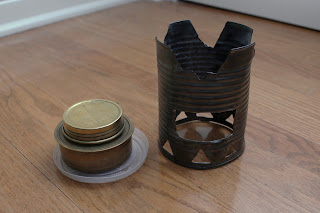
A brief follow-up: using my homemade soup-can pot stand, the lighting instructions: 1. The stove and stand are set out. In cold weather, the stove is set on a plastic soft drink lid to insulate against the ground.  2. The lid is remove, and the burner is lit. The pot stand is then carefully placed over the burner.  3. Wait approximately 30 seconds to let the burner 'bloom'; the  flame must come out of the burner's holes. Often, an audible 'pop' noise will signal that the flame has bloomed, and the stove is warmed  up. 4. Now, the stove is ready to cook food!  5. Unlike ready-made cooksets, this DIY pot stand must be removed with a pot gripper before  the stove can be extinguished. Once the hot pot stand is removed, the Trangia's lid is dropped over the flame to extinguish it. 

Gear Review: Trangia Alcohol Stoves

Image
My first post of the new year will deal with my little Trangia stove I've picked up a while ago. Now that I've been able to use it on a few day-hikes during the Christmas break, I can confidently review it. The first, and most obvious point, is that this is an alcohol stove; these stoves can burn the commonly found methanol, ethanol and even isopropyl rubbing alcohol. This stove cannot burn anything properly but alcohol - I tried white gasoline and ended up with a sooty, fireball-prone mess - and this could leave much to be desired in a third-world setting where kerosene/autogas (petrol) is all that may be found. But, here in Canada along with the US, most of South America, and Europe, methanol is easily found in nearly every hardware shop. Often it is labelled as 'methyl hydrate', and so people overlook it, but 4L can be be had for $10. Trangia burner w/ homemade soup can pot stand. The port is wide enough to allow use of the simmer ring. It is important that I sa