Posts

Showing posts from February, 2011

Update: Trail Construction

Image
I was wrong - the city is actually making pace with construction down by the bluffs. In fact, they currently have finished the  path connecting to Gates Gully.  I'm quite surprised at the speed with which they are progressing every day; after visiting the construction site a few times, they seem to mark progress with posts, which (by my measurements) average 4m of new road each day! At this rate, including all weekends and holidays, the 1.5 km segment remaining between Bluffers Park and Gates Gully should be finished in roughly one year from now. I accessed the trail via the Guild Inn, just as the last of the dump trucks and Toronto and Region Conservation   authorities were packing it in for the day. That's right - from what I can tell, this project seems to be planned from a "parks and rec" as well as "watersheds protection" angle, not so much for cyclo-commuting (insert sad emoticon of your choice here). But, I didn't really expect that it would eve
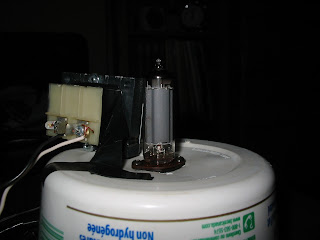
Tube Amp

Image
I have other loves in life other than cycling - some of them being electrical projects. I've been working on this baby for a while - but, only recently has it recieved its power transformer. I pulled the transformer from an old ceiling fan; 120v to 24 volts, with ~ 1/3 amp supply capability. And that voltage happens to be *almost* exactly what I need for the heater filament of the single 25EH5 tube that comprises the amp. However, measuring the wall voltage at an actual level of 126 volts, the voltage coming out of the transformer is actually above  25 volts (ie. 120/24=5, 126/5= 25.2 volts). This is well within the 10% tolerance of  the vacuum tube's operational voltage range, being only .9% off of ideal. Right now, until I find/build a proper wooden cabinet for it, the entire amp resides in an old margarine container. Fire hazard: kids at home, never  mount a transformer to anything using tape. Even if the tape is electrical tape. The rest of the amp's circuit is ve

Custom Gearing is Here!

Image
For any of those who don't know, the Sport Check in the Scarborough Town Centre is going out of business... and so they are having a closeout sale. No, this is not a promotion for the store - I simply saw a 7 speed wide-range cassette on sale at that store for 30% off, dropping the price to $15. Knowing that my bicycle's gearing is a bit high for fully loaded touring up big hills (I'm not super strong, either), I took the opportunity and bought the SRAM 12-32 gear cluster to customize my ride. Unboxing  I didn't have what one would call a "high" low gear before this upgrade - with 700c wheels, an 11-28t cluster in back and a 22-32-42t front crankset allowed for a lowest gear of  21.5 in, and a high of 104 in. I almost never used that high a gear, bust still had some trouble up hills with that low gear (especially on tour/ with load). The new 12-32 casette drops a little high-end, in return for a greater low-end; a gear of 18.8 in to 95.6 in. Strangely eno

The Frugal Man's Patch Kit

Image
Because of all the punctures I've had to patch, I came up with a use for the beyond-use tubes I have lying around.... I made them into new patches! Turns out you can use strips of the butyl rubber from old inner tubes to patch other inner tubes quite reliably. The extra stretch compared to regular patches may also be a bonus for high-pressure tubes, or for tubes in really wide tires. At the current price of $2.50 for a patch kit with 10 patches  and two tubes of rubber cement, that's $.25 every time I patch. However, the glue usually lasts longer than the ten patches, and so I can use about 10-15 more strips of inner tube as patches, halving the cost to ~$.12 per patch. Complete inner tube first-aid kit However, if I were to buy just the glue and inner tubes, the price would drop further. Rubber glue is ~$2 for a large tube, and a whole inner tube is $3.00 at my LBS, meaning I could patch about 50 tubes  for $5 dollars. I estimate each inner tube would make 100 patches, so

RIP: Snow Studs

I'm putting the snow studs to rest (for now) for two reasons: 1. There be no snow/ice on the roads as of late, and its > 5 degrees outside 2. They keep popping inner tubes! Despite my best efforts, and lining each tire with 3-4 layers of duct tape, the occasional screw would be able to wear through the protection and put a cut into the inner tubes. Its quite unfortunate, as they were really quite amazing ice tyres. The only way I can thing of salvaging them is buying a few rolls of Mr. Tuffy or some other tyre liner and completely covering the insides to protect the tubes. They really only seem to pop in hard cornering or trail/ off-road riding. I was caught out the other day up to my ankles in mud, where I had to change a tyre. I was not happy, needless to say, when I ran out of patches from how many punctures there were.

Homebrew Derailleur Adjuster

Image
'tis time to rejoice - a four-day weekend is here (for me, at least), and I plan on lots o' biking around. An interesting thing I managed to build up is a little do-hicky for fine-tuning my front derailleur; with a lack of down-tube stops, I had to get a little more creative. I took the adjustment screw from the mounts that came with my RSX shifters, and attached a nut to it, et voila! a 2-cent in-line barrel adjuster: It does its job, even if it ain't pretty. It mounts on the side of the shifters, where the derailleur cable leaves. I've already been on a few rain rides, and it hasn't shown any signs of rust, so the long-term prospects seem good.

Stitches

It's Sunday night... I've returned from a winter camping trip this weekend, near Acton. On the drive up, the window got stuck in the down position - so, I had a  very  breezy and chilly ride. 1 foot of snow when I got up to the site, and another foot fell on Saturday night, making the tent sag a bit under the weight. Quite great weather for a winter camp! Unfortunately, while cutting some wood, I sustained a nasty gash on my knuckle; I was able to see the bone!! Needless to say, I had to get patched up with some gauze, and then head to the hospital for a more permanent 'fix'. I wasn't really injured that badly - the blood wasn't pouring out - so the 2.5 cm cut was held together with 3 stitches. I guess I'll see how it holds up to swimming tomorrow!

Fail.

Image
While not strictly pertaining to the object of this blog, it's here anyway: Finally: A book costs more in the US than Canada! Looks as if someone didn't take care to check for punctuation, which, as we can see, makes all the difference. This is the back of my copy of "Love in the Time of Cholera", which we had to read for school. Look - the proof's on the paper...

Fully Completed.

Image
I've done it - the bike is completely finished, and it has been distance-proven; I took it for more than 40 km of wintery riding over the past two days. All the riding and abused has allowed me to 'dial in' all the settings of the bike: the Brooks saddle has been moved foreward, the derailleur cables have stretched/settled and been adjusted, the handlebars have been positioned, the STI levers have been re-positioned, and more than all these other combined, the new brakes have been worn in and re-positioned. Ta daaaah! Hells yeah - 'Standard' That's right; new brakes. Those old Shimano low-profile cantis are gone, and are replaced with one of the widest-of-wide profile brakes; some Tektro 720s. They really have cleaned up the problems, so now there is about 1/2 cm of clearance each side of the rims and more than double the braking power. The quality of workmanship is superb - they come with 6mm allen key fixing bolts, a stainless-steel bushing, both sides